Large wire loop antennas

THERE ARE TWO BASIC FORMS OF LOOP ANTENNAS: SMALL AND LARGE. THESE TWO TYPES have different characteristics, work according to different principles, and have different purposes. Small loops are those in which the current flowing in the wire has the same phase and amplitude at every point in the loop (which fact implies a very short wire length, i.e., less than 0.2 ). Such loops respond to the magnetic field component of the electromagnetic radio wave. A large loop antenna has a wire length greater than 0.2 , with most being either /2, 1 , or 2 . The current in a large loop varies along the length of the wire in a manner similar to other wire antennas.

Lambda/2 large loops

 The performance of large wire loop antennas depends in part on their size. Figure 14-1 shows a half-wavelength loop (i.e., one in which the four sides are each /8 long). There are two basic configurations for this antenna: continuous (S1 closed) and open (S1 open). In both cases, the feedpoint is at the midpoint of the side opposite the switch. The direction of the main reception, or radiation lobe (i.e., the direction of maximum reception), depends on whether S1 is open or closed. With S1 closed, the main lobe is to the right (solid arrow); and with S1open, it is to the left (broken arrow). Direction reversal can be achieved by using a switch (or relay) at S1, although some people opt for unidirectional operation by eliminating S1, and leaving the loop either open or closed. The feedpoint impedance is considerably different in the two configurations. In the closed-loop situation (i.e., S1 closed), the antenna can be modeled as if it were a half-wavelength dipole bent into a square and fed at the ends. The feedpoint (X1 X2) impedance is on the order of 3 kΩ because it occurs at a voltage antinode (current node). The current antinode (i.e., Imax) is at S1, on the side opposite the feedpoint. An antenna tuning unit (ATU), or RF impedance transformer, must be used to match the lower impedance of the transmission lines needed to connect to receivers. The feedpoint impedance of the open-loop configuration (S1 open) is low because the current antinode occurs at X1 X2. Some texts list the impedance as “about 50 Ω,” but my own measurements on several test loops were somewhat higher (about 70 Ω). In either case, the open loop is a reasonable match for either 52- or 75-Ωcoaxial cable.

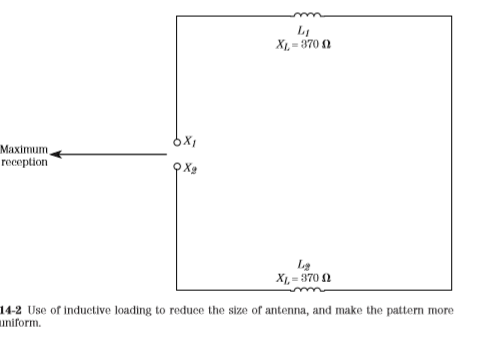
Neither Lambda/2 loop configuration shows gain over a dipole. The figure usually quoted is 1-dB forward gain (i.e., a loss compared with a dipole), and about 6-dB front-to-back ratio (FBR). Such low values of FBR indicate that there is no deep notch (“null”) in the pattern. A lossy antenna with a low FBR seems like a born loser, and in most cases it is. But the /2 loop finds a niche where size must be constrained, for one reason or another. In those cases, the /2 loop can be an alternative. These antennas can be considered limited-space designs, and can be mounted in an attic, or other limitedaccess place, as appropriate. A simple trick will change the gain, as well as the direction of radiation, of the closed version of the /2 loop. In Fig. 14-2, a pair of inductors (L1 and L2) are inserted into the circuit at the midpoints of the sides adjacent to the side containing the feedpoints. These inductors should have an inductive reactance XL of about 360 Ω in the center of the band of operation. The inductance of the coil is

The coils force the current antinodes toward the feedpoint, reversing the direction of the main lobe, and creating a gain of about 
1 dB over a half-wavelength dipole. The currents flowing in the antenna can be quite high, so when making the coils, be sure to use a size that is sufficient for the power and current levels anticipated. The 2- to 3-in B&W Air-Dux style coils are sufficient for most amateur radio use. Smaller coils are available on the market, but their use is limited to low-power situations.


Build Phasing Transformer Antenna

A directional antenna has the ability to enhance reception of desired signals, while rejecting undesired signals arriving from slightly different directions. Although directivity normally means a beam antenna, or at least a rotatable dipole, there are certain types of antenna that allow fixed antennas to be both directive and variable. See Chap. 7 for fixed but variable directional antennas and Chap. 11 for fixed and non-variable directive arrays. Those antennas are transmitting antennas, but they work equally well for reception. This section shows a crude, but often effective, directional antenna that allows one to select the direction of reception with pin plugs or switches.

Consider Fig. 13-10. In this case, a number of quarter-wavelength radiators are fanned out from a common feedpoint at various angles from the building. At the near end of each element is a female banana jack. A pair of balanced feedlines from the receiver (300-Ω twin lead, or similar) are brought to the area where the antenna elements terminate. Each wire in the twin lead has a banana plug attached. By selecting which banana jack is plugged into which banana plug, you can select the directional pattern of the antenna. If the receiver is equipped with a balanced antenna input, then simply connect the other end of the twin lead direction to the receiver. Otherwise, use one of the couplers shown in Fig. 13-11.

Figure 13-11A shows a balanced antenna coupler that is tuned to the frequency of reception. The coil is tuned to resonance by the interaction of the inductor and the capacitor. Antenna impedance is matched by selecting the taps on the inductor to which the feedline is attached. A simple RF broadband coupler is shown in Fig. 13-11B. This transformer is wound over a ferrite core, and consists of 12 to 24 turns of no. 26 enameled wire, with more turns being used for lower frequencies, and fewer for higher frequencies. Experiment with the number of turns in order to determine the correct value. Alternatively, use a 1:1 balun transformer instead of Fig. 13-11B; the type intended for amateur radio antennas is overkill powerwise, but it will work nicely.

The antenna of Fig. 13-10 works by phasing the elements so as to null, or enhance (as needed), certain directions. This operation becomes a little more flexible if you build a phasing transformer, as shown in Fig. 13-11C and 13-11D. Windings L1, L2, and L3 are wound “trifilar” style onto a ferrite core. Use 14 turns of no. 26 enameled wire for each winding. The idea in this circuit is to feed one element from coil L2 in the same way all of the time. This port becomes the 0° phase reference. The other port, B, is fed from a reversible winding, so it can either be in phase or 180°out of phase with port A. Adjust the DPDT switch and the banana plugs of Fig. 13-10 for the best reception.

Directional beam antennas

THE DIRECTIONAL BEAM ANTENNA DOES SEVERAL JOBS. FIRST, IT PROVIDES AN APPARENT increase in radiated power, because it focuses available transmitter power into a single (or at worst limited) direction.

For this reason, a bidirectional dipole has a gain of approximately 2 dB over an isotropic radiator. Add one or more additional elements, and the focusing becomes nearly unidirectional, which increases the effective radiated power (ERP) even more.

Second, the beam increases the received signal available at the inputs of the receiver. Antennas are generally reciprocal, so they will work for receiving as they do for transmitting. Finally, the directivity of the beam antenna allows the operator to null interfering stations. In fact, it is the last attribute of the beam that is most useful on today’s crowded bands.

All in all, if your funds are too little to provide both increased RF power and a good antenna system, then spend what is available on the antenna—not on the power. In this chapter we will focus on directional antennas that can be built relatively easily.

It is assumed that most readers who want a triband multielement Yagi will prefer to buy a commercial product, rather than build a homebrew model. The material herein concentrates on homebrew projects that are within the reach and capabilities of most readers. The first of these is not a beam antenna at all, but rather a rotatable dipole.

Rotatable dipole 
The dipole is a bidirectional antenna with a figure-8 pattern (when viewed from above). The dipole is a half-wavelength and is usually installed horizontally, although vertical half-wavelength dipoles are known. Although the length of the dipole is too great for rotatability at the lower bands, it is within reason for the higher band. For example, the size of the halfwave dipole is approximately 16 ft on 10 m and 22 ft on 15 m. Even the 33-ft length on 20 m is not unreasonable for amateur constructors. The length of the dipole is found from


This length is approximate because of end effects and other phenomena, so some “cut and try” is required. Example 12-1 Find the length of a dipole antenna for a frequency of 24.930 MHz in the 12-m amateur radio band. Solution:

The half-wave dipole is fed in the center by coaxial cable. Each element of the dipole is one-half of the overall length (or, in the example given, about 9.4 ft). Figure 12-1 shows a rotatable dipole that can be designed for use on 15, 12, and 10 m. The radiator elements are made from 10-ft lengths of 3⁄4-in aluminum tubing. The tubing is mounted on “beehive” standoff insulators, which in turn are mounted on a 4-ft length of 2 2 lumber. 

The lumber should be varnished against weathering. In a real pinch, the elements can be mounted directly to the lumber without the insulators, but this is not the recommended practice. The mast is attached to the 2 2 lumber through any of several means. 

The preferred method is the use of a 1-in pipe flange. These devices are available at hardware stores under the names floor flange and right-angle flange. The 10-ft lengths of pipe are the standard lengths available in hardware stores, so it was selected as being closest to the required 22 ft for 15 m. A 0.14-µH loading coil is used at the center, between the elements, in order to make up for the short length. The dimensions of the coil are 4 to 5 turns, 0.5-in diameter, 4-in length. For low power levels, the coil can be made of no. 10 (or no. 12) solid wire—and, for higher levels, 1⁄8-in copper tubing. There are two basic ways to feed the antenna, and these are shown in details A and B in Fig. 12-1. The traditional method is to connect the coaxial cable (in parallel) across the inductor. This method is shown in Fig. 12-1, detail A. 

A second method is to link couple the coil to the line through a one- to three-turn loop (as needed for impedance matching). This is the method that would be used for a toroidal inductor. Lower frequencies can be accommodated by changing the dimensions of the coil. The coil cannot be scaled, simply because the relative length of the antenna changes as the frequency changes. But it is possible to cut and try by adding turns to the coil, one turn at a time, and remeasuring the resonant frequency. 

Adding inductance to the coil will make the antenna usable on 17 m and 20 m, as well as on 15 m. Another method for building a rotatable dipole for lower frequencies is to increase the element lengths. On 17 m, the overall length is approximately 27.4 ft, so each element length is 13.7 ft long. This length can be achieved by either of two methods. First, adjacent sizes of aluminum tubing are designed so that the smaller will be a slip-fit inside of the larger. What constitutes “adjacent sizes” depends on the wall thickness, but for one common brand, the 7⁄8-in is adjacent to the 3⁄4-in size. 


You can use two smaller lengths to make the larger lengths of pipe, and cut it to size. This method is only available to those readers who have a commercial or industrial metals distributor nearby, because the 16-ft lengths are not generally available from hardware stores. Bands higher than 15 m (i.e., 12 and 10 m) can be accommodated by using the 10-ft lengths of tubing, but without the inductor. The tubing is cut to the desired half-wavelength size and used directly.


360 Degree Directional Array Antenna

The phased vertical antenna concept can be used to provide round-the-compass control of the antenna pattern. Figure 11-5A shows how three quarter-wavelength verticals (arranged in a triangle that is a half-wavelength on each side) can be used to provide either end-fire or broadside patterns from any pair (A-B, A-C, or B-C).

Any given antenna (A, B, or C) will be grounded, fed at 0°, or fed with 180°. The table in Fig. 11-5B shows the relative phasing for each direction that was labelled in Fig. 11-5A. Either manual phase changing or switch-operated phase changing can be used, although the latter is preferred for convenience. Some international showcase broadcasters use antenna arrays formed into two or more concentric circles of vertical elements, with one element at the center. Selection of elements and phasing determines directivity and gain.


Feeding Phased Array Antenna

The second variation, shown in Fig. 11-2B, supposedly produces a 180° phase shift between antenna A and antenna B, when length L3 is an electrical half-wavelength. According to a much-publicized theory, the system of Fig. 11-2B


ought to produce the pattern of Fig. 11-1B—yet experience shows this claim is false. It seems that there are several problems with the system in Fig. 11-2B.

First, coax has a property called velocity factor(VF), which is the fraction of the speed of light at which signals in the cable propagate. The VF is a decimal fraction on the order of 0.66 to 0.90, depending upon the type of coax used. Unfortunately, the physical spacing between A and B is a real half-wavelength (L3 = 492/F), but the cable length is shorter by the velocity factor [L3' = (VF × 492) /F].

Consider an example. A 15-m phased vertical antenna system will have two 11-ft radiators, spaced 22 ft apart (approximately, depending upon exact frequency). If we use foam coax, with VF = 0.80, the cable length is 0.8 × 22 ft, or 17.6 ft. In other words, despite lots of publicity, the cable won’t fit between the towers! Second, the patterns shown in Fig. 11-1 are dependent upon one condition: the antenna currents are equal. If both of them are the same impedance, and are fed from the same transmitter, then it is reasonable to assume that the currents are equal—right? No, wrong! What about coax loss? Because of normal coax loss, which increases at higher frequencies, the power available to antenna Bin Fig. 11-1B is less than the power available to antenna A. Thus, the pattern will be somewhat distorted, because the current produced in Bis less than the current in A, when they should be equal.

The first problem is sometimes fixed by using unequal lengths for cables L1 and L2 (Fig. 11-2A), and using it for the out-of-phase case. For example, if we make L1 one-quarter wavelength and L2 three-quarter wavelength (Fig. 11-2C), antenna A is fed with a 90° phase lag (relative to the tee connector signal), while antenna B is fed with a 270° phase shift. The result is still a 180° phase difference.


Unfortunately, we have not solved the current level problem, and may have actually made it worse by adding still more lossy cable to the system. There is still another problem that is generic to the whole class of phased verticals. Once installed, the pattern is fixed. This problem doesn’t bother most point-topoint commercial stations, or broadcasters, because they tend to transmit in only one direction. But amateurs are likely to need a rotatable pattern. Neither the antennas in Fig. 11-1A nor that in Fig. 11-1B is rotatable without a lot of effort—like changing the coax feeds, or physically digging up the verticals and repositioning them. Fortunately, there is a single solution to all three problems. Figure 11-3 shows a two-port phasing transformer made from a toroidal balun kit. Use the kind of kit that makes a 1:1 balun transformer. Although we are not making a balun, we will need enough wire to make three windings, and that is the normal case for 1:1 baluns. Amidon Associates and others make toroidal balun kits.

Wind the three coils in trifilar style, according to the kit instructions. The dots in Fig. 11-3 show the “sense” of the coils, and they are important for correct phasing; call one end the “dot end” and the other end the “plain end” to keep them separate. If the dot end of the first coil is connected to J3 (and the transmitter), then connect the dot end of the second coil to the 0° output (J1, which goes to antenna A). The third coil is connected to a DPDT RF relay or switch. In the position shown, S1 causes the antennas to be 180° out of phase. In the other position, the “sense” of the third coil is reversed, so the antennas are in phase. Another phasing method is shown in Fig. 11-4. In this scheme, two convenient, but equal, lengths of coaxial cable (L1 and L2) are used to carry RF power to the antennas. One segment (L1) is fed directly from the transmitter’s coaxial cable (L3), while the other is fed from a phasing switch. The phasing switch is used to either by


pass or insert a phase-shifting length of coaxial cable (L4). For 180° phasing use the following equation to find the length (L4):


where L is the length of L4, in feet VF is the velocity factor (a decimal fraction) FMHz is the operating frequency, in megahertz
Some people use a series of switches to select varying amounts of phasing shift from 45° to 270°. Such a switch allows them to select any number of other patterns for special situations.