
You found this article because you wanted to know how to create a
website, right? After understanding what a website is, many people
want to have their own website. You too, right?
Unfortunately, many people worry that creating a website is very
technical. Even though it's not like that. Incidentally, we will
thoroughly discuss the tutorial for creating a beginner-friendly
website.
Why is that? You see, you can create a website from scratch
without coding at all. Curious? Come on, see the complete
explanation below!
How to Create a Professional Website in Easy Steps!
Many people think creating a website is difficult. In fact, anyone
can create a website and get many website benefits from it.
You can start creating a website with the following steps:
Determine the Type of Website :
Select Website Platform
Use the Right Web Hosting
Choose an Attractive Domain Name
Install WordPress
Login to WordPress Dashboard
Install an Attractive Theme
Install the required plugins
Create Your Website Pages
Manage Menus on the Website
Website Search Engine Optimization (SEO).
Improve Website Security
Monitor Website Performance by Installing Google Analytics
Let's start with the first steps on how to create a website from scratch:
1. Determine the type of website you will create
Before going further into how to create a website, you need to
determine what type of website you want to create.
That way, you will have a clearer website concept. This is important
because it will influence the choice of web hosting, domain and
website theme.
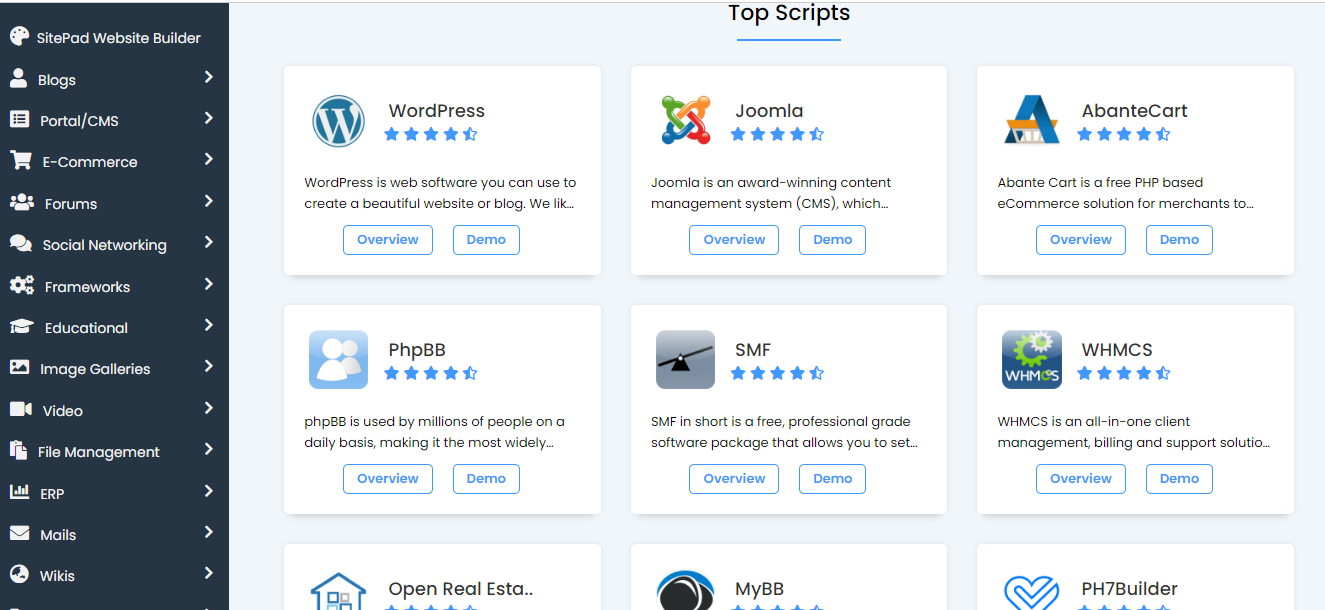
Popular types of websites that you can choose include:
Online shop website.
An online shop website or Ecommerce is a website for making online
sales, starting from goods, digital products or services. Nowadays,
creating an online shop website is increasingly easy, even for
beginners. Example : WooCommerce is a WordPress plugin that is
primarily used for selling products or services online. Regardless if your
products are digital or physical, WooCommerce makes it easy to build
an online store that is customised specifically to your business needs.
WooCommerce also makes it easy to manage your inventory, take securepayments, manage shipping, and will even apply taxes accordingly.
Personal blog or website.
A blog is a type of website that is managed individually or
collectively with information that is always updated. In general,
blogs are recognized by the arrangement of the newest articles at the
top. A blog can be used for personal or business purposes. Different
from other types of websites, the advantage of blogs is that they
make it easy to build engagement from their visitors. This is
supported by the comments feature which is available by default.
Portfolio website.
Portfolio websites are used to build a professional online identity.
On this website, you can freely display your best work. That way,
it will make it easier for people around the world to know your
expertise. A portfolio website is equally important for those of you
who work for a company or freelancers.
News site.
As the name suggests, a news site or website is a type of website that
contains the latest news articles. The news information displayed can
be general in nature or for certain regions or special topics. You
don't need to wait to have a big media presence to create a news
website. The key is to present actual and credible information.
Forum website.
Forum websites can be a forum for sharing information for an online
community. Starting from the automotive community, technology
to culinary fans. If you have a community whose members come
from various regions, creating a website as a sharing forum is very
appropriate.
Those are some of the options. So, what type of website do you want
to create?
If you have decided on the type of website, let's move on to the next
way to create a website, namely determining the website platform.
2. Choose a Website Platform
You can create a website without needing to know the meaning of
coding at all. You don't even need to type HTML, CSS or PHP
code in it
Why is that? Apart from being complicated, creating a website using
these steps will take quite a long time. After all, there is a way to
create a website without coding at all.
The solution is to use WordPress!

Create a website with the wordpress platform
WordPress is a platform for easily creating websites without having
to master programming.
By creating WordPress the right way, you only need to do a one-click
installation. Just enter the name, website description, and choose a
template, your website can be accessed via the internet.
You can create a website without needing to know the meaning of
coding at all. You don't even need to type HTML, CSS or PHP
code in it
Why is that? Apart from being complicated, creating a website using
these steps will take quite a long time. After all, there is a way to
create a website without coding at all.
The solution is to use WordPress!
Create a website with the wordpress platform
WordPress is a platform for easily creating websites without having
to master programming.
By creating WordPress the right way, you only need to do a one-click
installation. Just enter the name, website description, and choose a
template, your website can be accessed via the internet.
The good news is, you can create a free website using WordPress.
The reason is, the WordPress platform itself is free and open source.
Even though it's free, it doesn't mean that the website produced by
the Content Management System platform is not good. On the
contrary, you can create a free website with the best quality using
Even though it's free, it doesn't mean that the website produced by
the Content Management System platform is not good. On the
contrary, you can create a free website with the best quality using

The proof is that many large companies have trusted WordPress
to create their websites. Some of them are SONY Music, Microsoft
News Center, The Walt Disney Company, and The New York Times
Company.
And I recommend you sign up to Bluehost Wordpress hosting , it is
the cheapest and the best web hosting starting from $2.95/month,
In short, choosing the WordPress platform
is always a recommendation for how to create a website for
beginners. However, this step is also suitable for developing a
larger website.
Now Start building your online empire today with Bluehost.com !
Next, let's move on to the steps to create a website related to domains
and hosting.
3. Use the Right Type of Web Hosting

Get your website up and running in minutes with Bluehost!
Good Security Protection. With protection from malware, and an
encrypted connection (SSL), your website can be safer from
interference.
With all the advantages of cheap cloud hosting, you can use it for online shop websites with lots of visitors.
Choose a Cheap Cloud Hosting Package
VPS Hosting For personal websites that don't have many visitors, there's no harm
in creating a free website. However, for important websites such as
online shops or company websites, it's a good idea to spend a little on
investment.
That's right, we recommend that you
subscribe to the best quality web hosting such Blue Host and buy a
unique domain name according to your website.
Domain hosting relationship and website files
Hosting is a place to store all website files so they can be accessed
online. A website will have files in the form of themes, plugins, text,
media, HTML code, and draft content. All of this is stored on web
hosting.
There are several types of hosting services, namely shared hosting,
cloud hosting, and VPS. Each type of hosting has its own advantages
and disadvantages. Here are the three most widely used types of web
hosting.
Shared hosting is a hosting service that is quite popular. Shared hosting has a relative
ly affordable price and is easy to use.
Shared hostingis generally supported by support services to help beginners use it
well. So when there is a problem, you can get help from customer
support.
Therefore, shared hosting is suitable for beginners who are just
starting to create websites.
What are the other advantages of Shared Hosting?
Ease of Installation. You don't need to be confused about installing
and configuring WordPress for your website. Everything can be done
with one click.
Reliable Performance. Your website will work better with web server
support with the latest technology.
Free Domain and SSL. You can build a website more quickly and easily with guaranteed
security.
Unlimited Bandwidth. You are free to use bandwidth according to
reasonable usage.
With these various advantages, shared hosting is suitable for personal
blogs, portfolio websites, and online shops.
Build your dream website with our reliable hosting and domain
However, Shared Hosting certainly has its drawbacks. For further
details, please visit the article on the advantages and disadvantages
of Shared Hosting.
Choose a cheap cloud hosting package now !
Cloud hosting is a web hosting service that is a combination of the ease of
management of shared hosting and the large capacity of VPS hosting.
That means, if you don't have the technical expertise to manage a
VPS, but want to have large capacity, cloud hosting is the right
solution.
Some of the advantages of using Cloud Hosting are:
Fully Managed. Ease of managing high traffic even without technical expertise.
Huge Resources. You can build a website with minimal disruption thanks to greater
resources.
Easy to Manage. The freedom to choose a platform and its ease of installation will
help you focus on business development.
Good Security Protection. With protection from malware, and an encrypted connection (SSL),
your website can be safer from interference.
With all the advantages of cheap cloud hosting, you can use it for
online shop websites with lots of visitors.
If you are confused about choosing, the article Shared Hosting vs
Cloud Hosting: Which is Better? will provide a more complete
answer.
Choose a cheap Shared Hosting package now !
VPS is a type of hosting that has a higher traffic capacity than shared
hosting.
What you need to remember is that VPS is only recommended for
developers who already have technical expertise. The reason is, when
using a VPS, you have to configure the server independently.
That means, those of you who already understand the technicalities
of how to create a website smoothly are recommended to use this
service.
The support services provided are limited because VPS hosting
providers usually do not have access to the server. Because the server
is managed independently by the VPS hosting user.
What are the other advantages of VPS Hosting?
Optimal Performance. The best device support will provide more
optimal website performance, including when traffic is high.
Better Online Reputation. There is a special IP to maintain your
online reputation and can be obtained at no additional cost.
Freedom of Management. Starting from choosing the OS to the Panel,
you manage your website more freely.
Ease of Backup. You can backup and restore your website more
easily. Just one click.
Thanks to the large resources it has, VPS Hosting is widely used for
types of websites such as streaming services and the like.
Choose a cheap VPS Hosting package now !
Which Hosting Service is Right for You?
In terms of cost, shared hosting is the cheapest hosting package and
VPS is the most expensive. So, if you are looking for cheap web
hosting, the shared type could be your first choice.
Based on ease of use, VPS is the most difficult type of hosting, and
shared hosting and cloud hosting are easier because both are fully
managed.
If you look at the traffic capacity that can be accommodated, VPS and
cloud hosting can accommodate more traffic than shared hosting.
In essence, you need to adjust your choice of hosting package to your
needs and budget in order to produce an optimal website. So, if you
want shared hosting with unlimited bandwidth and a free domain,
you can choose the Niagahoster service.
Limited offer…
The Best Web Hosting, Free Domain for 1st Year
Free SSL Certificate Included, 1-Click WordPress Install
Expert 24/7 Support, Secure reliable hosting
Starting at $2.95/mo*, Regularly $11.99 12/mo term, Get Started Now
Bring your website to life. Web hosting is the easiest, most
economical way to get your website connected to the Internet so you
4. Choose an Attractive Domain Name
Apart from hosting, you also need a domain name to create a website.
Why do you need a domain?
In simple terms, a domain is the address for your website so that
people can easily access the website through a browser.
For example, when people want to visit the Niagahoster website, they
only need to type www.niagahoster.co.id as the domain name they
want to access. Later, in the browser the Niagahoster website will
appear.
Domain names do not always have to end in .COM. You can choose
a domain name with one of the various domain extension options
available. From .NET, .INFO, .XYZ, .IO (.io), .CO, .ONLINE, .SITE
etc
Get a Free Domain Name with a WordPress Hosting Plan
Have you thought about a domain name for your website?
There are several strategies for determining a domain name that you
can apply. Here are tips for deciding on a domain name:
Use words that are easy to spell and remember
Don't just stick to .COM, you can be creative with various other
unique domain extensions. Avoid using hyphens and numbers.
Make sure the domain name you choose does not involve someone
else's copyright.
Create a domain name that is short, concise and clear
Match the domain name to the business image or persona you want to
build. Adjust it to the origin of your target visitors
Don't delay buying a domain so that someone else doesn't take your
dream domain.
What's no less interesting is that in addition to these tips, you just
have to buy hosting to get a TLD domain & cheap domain for free!
Of course, buy it now at Bluehost.com
5. Install WordPress on your website
Because WordPress is the recommended platform for creating website
s, you need to install WordPress on your website.
However, if you buy hosting at Bluehost, you don't need to bother
installing WordPress manually.
Bluehost provides an Auto Install WordPress feature which makes it
easier for you to create a website.
However, we will still discuss how to install WordPress manually,
if you forget to activate the Auto Install WordPress feature when
buying hosting.
What is cPanel ?
Often referred to as “control panel,” cPanel is an interface for
customising and making changes to your hosting account with
Simply put, cPanel is a Linux-based control panel that provides users
with a dashboard that allows them to manage a range of elements on
their site.
Easy to learn and simple to use, cPanel is among the most popular
control panels used to make websites run more efficiently.
Some of the great features that cPanel includes are:
Email: Within cPanel you can create new email accounts,
view/modify your existing accounts, modify your MX records,
change email passwords, set up mailbox quotas and much more.
Domains: Under the domains section of cPanel, you can configure new
domains to your account, set up parked domains, create subdomains,
setup redirects, and much more.
File Management: In the files section of cPanel, you can backup your cPanel account,
access/modify files stored in your account, review your disk usage,
and create/manage FTP accounts.
Databases: Here you can create new databases, set up remote access
to MySQL, access the databases using phpMyAdmin, and much
more.

cPanel is the control centre for your hosting service. That's why
links and login information will always be provided via email after
purchasing web hosting.
Generally, you just access a URL like this:
Build your dream website with our reliable hosting and domain
How to create a website can be easier thanks to Softaculous Installer.
To use it, in the SOFTACULOUS APPS INSTALLER section in
cPanel, click the WordPress logo. Choose the WordPress platform

You will see information about the WordPress platform that will be
used in the steps to create a website.
In the Install section, click the Install Now button.Create a website
with the wordpress platform.


There is some information that needs to be filled in before the steps
to create a website continue.
First of all, in the Choose Domain column, please enter the domain
name that will be used for the installation. You can leave the In
Directory column blank. Join thousands satisfied customers who
trust Bluehost.com for their hosting and domain needs.
Fill the install form
After clicking on the Install button, you need to fill in the form displayed as shown in the
screenshot below. The form asks for lots of details (which are
prefilled by default), you can change it if you need or leave it as it is
and proceed with the installation with default values.
Choose Installation URL : Choose the domain and the folder where
you want to install WordPress.
Note : If you want to install WordPress in document root i.e.
example.com and NOT in a sub directory i.e. example.com/wp
then leave the In Directory field as blank.
Admin Username : Choose the username to be used for WordPress admin account
Admin Password : Choose the password to be used for WordPress admin account
Admin Email : Choose the email to be used for WordPress admin account
Select Language : Select the language in which you want to install WordPress

After filling the form click on the Install button to start the installation
process.
Sit back and relax, let Softaculous handle the installation process for
you.
Even though there is information provided by default, it is best to fill
in the name of your website and its description, in the Site Name and
Site Description columns.
Why wait? Get started on your website today with our affordable
It is important to pay attention to the steps to create this website,
namely creating a username and password. Determine your username
and password to log in to your WordPress dashboard. Make sure you
remember this information.
Select theme from free options themes on dashboard

Get online in minutes with our easy-to-use hosting and domain
Installation Wordpress Complete!

If all the previous information is correct, all you have to do is
continue the installation process.
After the installation process is complete, a success message will
appear containing the website address and login URL to the admin
dashboard.
Ready to launch? Get started with our hosting and domain services
6. Login to your WordPress Website Dashboard
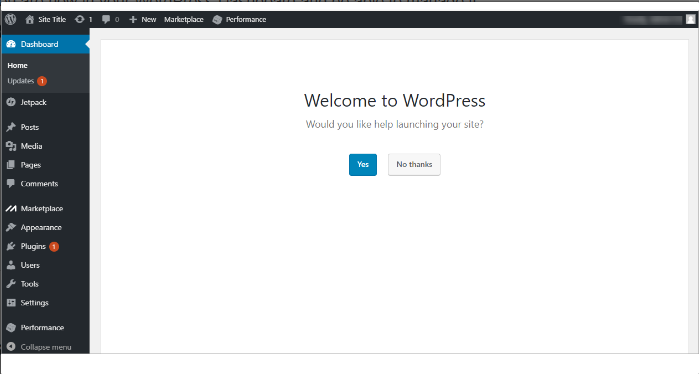
The WordPress you just installed is the default version of WordPress.
So all the settings are still basic so that your WordPress website will
look the same to other new users.
For this reason, you need to make settings to produce an optimal
website. To do this, you need to first log in to the WordPress
dashboard. How to log in to the WordPress dashboard is as follows:
Step 1. Go to www.yourdomain.com/wp-admin
Step 2. Enter Username and Password
Step 3. Voila, you have successfully logged in to your WordPress
admin area!
Get online in minutes with our easy-to-use hosting and domain
WordPress dashboard page when creating a successful
website
After successfully logging in to WordPress, you will be directed to
the WordPress dashboard. This dashboard is a place where you can
access all the features provided by WordPress, from configuration,
plugins, to themes
So, in this dashboard you can manage your WordPress website,
starting from changing settings, publishing content, creating pages,
adding plugins, and so on.
Let's continue the settings on the next page..
7. Install an Attractive theme
The WordPress installation process includes theme selection. The
difference is, your website usually automatically uses the default
WordPress theme.
Even though the default WordPress theme is quite attractive, you can
replace it with a theme that suits the website design you want. You
can read our article on website design tips so you can choose the best
one.
There are lots of free WordPress themes that you can choose from.
The important thing is to make sure you choose an official and SEO
friendly theme so that website performance is more optimal. Apart
from that, avoid using pirated themes that can harm your website.
How to use a specific theme in WordPress?
First of all, open the WordPress dashboard then click the Appearance
menu > Themes > Add New.
Choose a Theme
At the end you will see the section to choose a theme for your
installation that you are going to install.
Here you can select many themes and see the Demos of those
themes.
Click on the theme you wish to install.

The following page will open, click on the Demo button in order
to view the demo of this theme. If you wish to install this theme
then click on the Select theme button.

On selecting the theme you’ll be directed to the installation
form. Now click on the install button and your installation will
be made with the selected theme.
Join the ranks of successful online businesses with our hosting and

8. Installing a WordPress Plugin
A WordPress.com website has many more built-in features than a
self-hosted WordPress site, meaning you won’t need a plugin for many common features.
Before installing a plugin, check this list to ensure the feature isn’t
already available on your site.
WordPress is known as a content management system with many
plugins to make websites more optimal. Unlike themes, generally
new WordPress websites do not have default plugins.
Because plugins are important for adding website functionality, we
include plugin installation in the steps on how to create this website.
Here are the steps to install a WordPress plugin on your website:
To install any plugin:
- Visit your website’s dashboard.
- On the left side, click on Plugins.- Scroll down to discover popular plugins, or use the search box to type the name of a specific plugin or feature you’re looking for.-
- Click on a plugin name to read about it – what functionality it
provides, how it works, and how to adjust its settings.-
- Check the following information about the plugin:
Ratings: This shows feedback from customers who installed the plugin. A low rating may indicate other site owners have not had a
good experience with the plugin.
Last updated: A recent date indicates that the plugin is actively supported
and worked on. Avoid plugins that have not been updated in a
long time.
Active installations: A high number indicates a popular and
well-supported plugin.
Tested up to: Ensure the plugin is compatible with the version of WordPress
you are running. WordPress.com sites always use the latest version
automatically. If you are happy with the plugin, click the “Install and activate” button to add it to your site:

Launch your website with confidence – choose Bluehost for
dependable service and support !
9. Create Website Pages

According to the settings you use, access to the domain name will go
to that page. Generally, the default theme will redirect to the blog
page.
WordPress itself has content in the form of posts and pages. Posts in
the form of articles on blogs and pages in the form of website pages as
needed.
Depending on the type of your website, the website pages you must
have include:
Home — The main page of the website that visitors to your website
visit first
About Us — explains the what and who of your website and business
Contact — provides information to contact the website owner
Disclaimer — disclaims certain responsibilities
Privacy Policy — contains information about how privacy is managed
by the website
Product Page — An online store page that displays various products
for sale
Cart Page — An online store page that stores products that visitors
will purchase
To create a website page in WordPress, you simply go to the
Pages > Add New menu.
On the block editor page, you can enter information according to the
type of page you are creating. Don't forget to click Publish when
finished.
The next step, you can determine which main page appears when the
domain name is accessed.
Make a better website with the right main page settings
The method is to go to the Settings > Readings menu. In the Your
homepage display section, select A Static Page. Then determine
which pages will be the Homepage and Posts Page.

To add a new page to your website, take the following steps:
Visit your site’s dashboard.
Click on Pages on the left side.
Click on the “Add new page” button.
Choose from a large collection of readymade page layouts,
or click “Blank page” to create an empty page.
Give your page a title by typing it in the box at the top that
says “Add title“.
If you selected a page layout in step 4, a title will have been
added for you. You can edit this title if you wish.
Click on the + block inserter icon to add new content, or
click on any block to edit existing content
Ready to launch your website? Get started with our affordable

How to create a website is incomplete without arranging the menus on
the website. With a neat menu, visitor user experience will be better.
Because, it will make it easier for them to access site pages easily.
To create a menu on a website, you can follow these steps:
Step 1. Go to WordPress Dashboard > Appearance > Menus
Step 2. On the Menu page, select Create a new menu
Step 3. In the Menu Structure, enter the name of the menu in the
Menu Name column
Step 4. In the Settings menu, check the options according to your
wishes.
Step 5. Click the Create Menu button to save the menu creation
Step 6. Select the page or category you want to include in the menu
in the Add menu items
Step 7. Save the settings every time you make changes to the Settings
Menu.
Make your website stand out from the crowd with our customizable
11. SEO optimization of your website
You certainly want your website to appear on the first page of Google
search results, right? For this reason, make sure you also learn SEO
and practise it on your website.
It's easy, for starters, you can start with the following three steps:
A sitemap is a list of website pages that can be accessed by users and
search engines. The function of a sitemap is to provide instructions to
users and search engines regarding all the pages that can be accessed
on the website.
Since the release of WordPress 5.5, sitemaps are now automatically generated for your website. The
default sitemap for any WordPress site running 5.5 or later is located
at [insert your domain name here]/wp-sitemap.xml.
You can also access the default sitemap using [insert your domain
name here]/sitemap.xml
Before you look at your sitemap, make sure that search engines can
search your index. If this is not selected, you might get a 404 error.
Go to Settings -> Reading -> Make sure Search Engine Visibility is not selected.

Now go to your browser and type in [insert your domain name
here]/wp-sitemap.xml] to look at the sitemap WordPress automatically generates for you.
The type of content you have on your site will determine what is
displayed on your sitemap. Your sitemap may look like the one below.
This sitemap tells us that our site has 6 URLs, each representing a type
of content with additional metadata about that content.
Posts
Pages
Categories
Tags
Post format
Users

Let us have a look at the first URL on the list (Posts). When you click
on the link, it will give us more information (metadata) about the
Posts on our website.
This sitemap tells us there are 59 URLs, each one representing a
single blog post.
Clicking on a blog post (2) will take you directly to that post.

If you do not have WordPress 5.5 or later installed, you will need a
plugin to help you generate a sitemap. Some of the popular plugins
used for managing sitemaps in WordPress are:
Jetpack includes the same simple sitemap function as WordPress
5.5
Google XML Sitemaps generates an XML sitemap with options
for managing configuration.
XML Sitemap & Google News generates an XML sitemap and
complies with the Google News Sitemap protocol
The following plugins offer many more SEO features in addition to
sitemaps:
Any website can benefit from an XML sitemap to guide proper index
ing by search engines. SEO, content marketing, and other web
strategies will benefit from using a sitemap as the base for a
successful campaign. While a sitemap is a basic XML format, there
are variations for managing which web pages are included and what
information is provided. WordPress offers a basic sitemap that is
automatically created on your website. There are many plugins to
choose from for additional functionality that provides you with an
XML sitemap and other SEO features.
If your website has existed for some time, it’s likely to be not only in
Google search results but other search engine results as well.
However, if you are launching a new domain or launching a new site
design for an existing domain, you should check that the major search
engines are accurately indexing your website and using your sitemap.
Your website deserves the best – choose Bluehost for unbeatable
A permalink (i.e., permanent link) is the URL of your page, blog post, and other
content on your site. Use the permalink to share a link to your content
on social media, in an email, or anywhere else online. This guide will
explain how to find and change the format of your site’s permalinks.
About Permalinks
This is an example of a permalink for a page:
https://yourgroovydomain.com/my-page
This is an example of a permalink for a blog post:
https://yourgroovydomain.com/2024/01/01/first-blog-post
In the above examples, the last part of the URL address (known as the
‘slug’) is my-page and first-blog-post. The slug is the part of the URL
that refers to that specific page. WordPress automatically generates
the slug when you give a page, post, category, or tag a title. For media items, the file name on your computer or device is
used for the permalink.
If you create a page called ‘Home’ that is not set as your homepage,
the page will receive a slug just like any other page, e.g.,
https://yourgroovydomain.com/home. Once you set this page as
your homepage, the slug will be removed, and the URL will change to just
https://yourgroovydomain.com.
Duplicate Permalinks
No two pages, posts, or media items can share the same permalink
address. If WordPress detects the same URL being used more than
once, it will add a number to the URL to differentiate it.
For example, if you wrote a post titled “Happy New Year”, the
permalink would use happy-new-year for the URL. If you were to
write a similar post with the same title the following year, the
permalink would be happy-new-year-2 to ensure that the two posts
have unique addresses. You can change the number to something else
by following the steps in the next section.
You can customise the last part of the permalink (i.e. the web
address/URL) by following these steps:
Don't wait – start building your online empire today with
Bluehost.com !
Pages and Posts
In your site’s dashboard, navigate to Pages or Posts.
Click on the page or post you wish to edit.
Open the settings sidebar.


If you do not see the sidebar on the right, click the Settings icon in the
top right corner to bring up the settings. This icon looks like a square
with two uneven columns:

Under the “Summary” section, locate the URL. Click on the
link here to open a popover where you can change the
permalink.
Type the new text and click the X to close the pop-over. The
permalink will update with the new text.
Click the “Update” button or “Publish” button to save your
changes.
URLs cannot accept certain characters like spaces, punctuation marks,
currency symbols, and anything else that isn’t a letter or a number.
In those cases, the special character is either replaced with a hyphen
( – ) or omitted from the URL entirely.
Certain words cannot be used as a permalink because the path is
reserved for a folder on WordPress sites. These words include avatar,
bin, blog-search, forums, gadgets, i, login, m, wp-admin, wp-content,
wp-includes, XML, plus any 4 digits (for example, 2024).
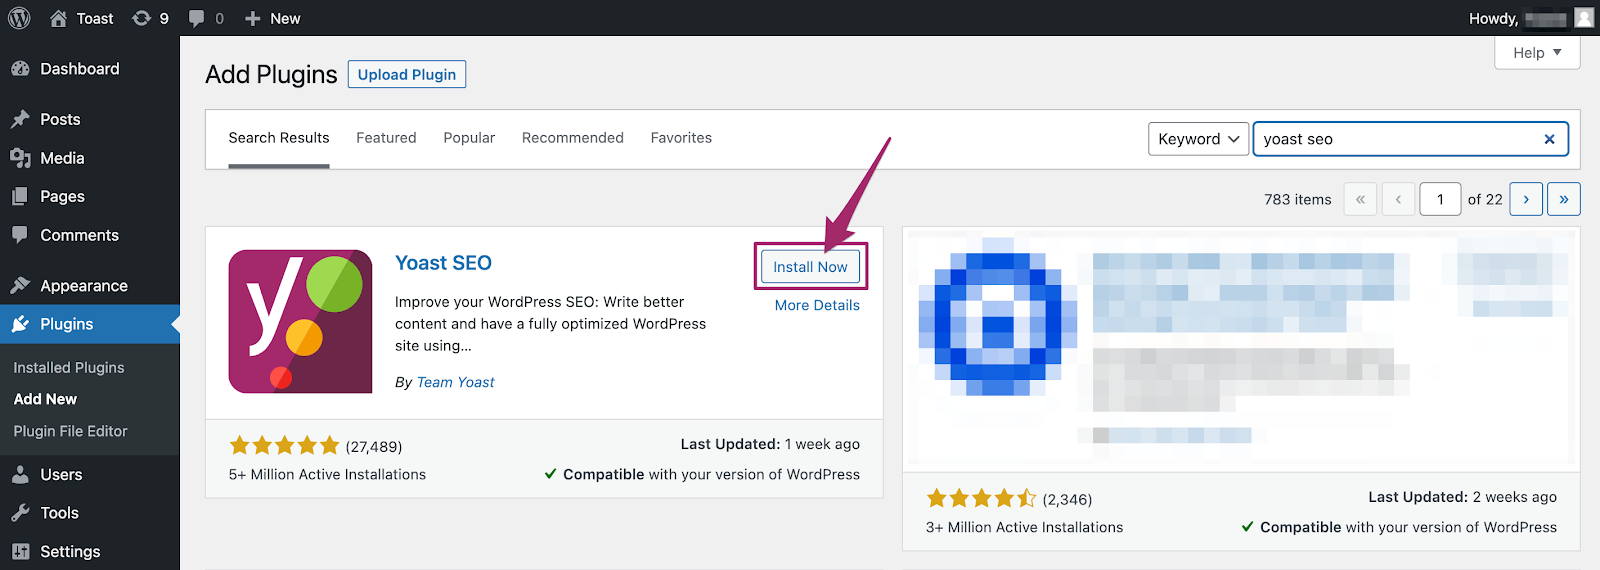
SEO plugins make it easier for you to optimise SEO on your website.
One of the SEO plugins that you must install is Yoast SEO.
This plugin can help you add SEO titles and meta descriptions to posts
and website pages. Apart from that, there are many more ways to set
Yoast SEO to help optimise your website.
How to install Yoast SEO for WordPress
To install the free Yoast SEO for WordPress plugin on your WordPress
site, follow the steps below.
- Log in to your WordPress websiteWhen you log in, you will be in your
- Click on Plugins in the menu on the leftThe

- In the search bar, search for
- Search for Yoast SEO
- Click Install Now
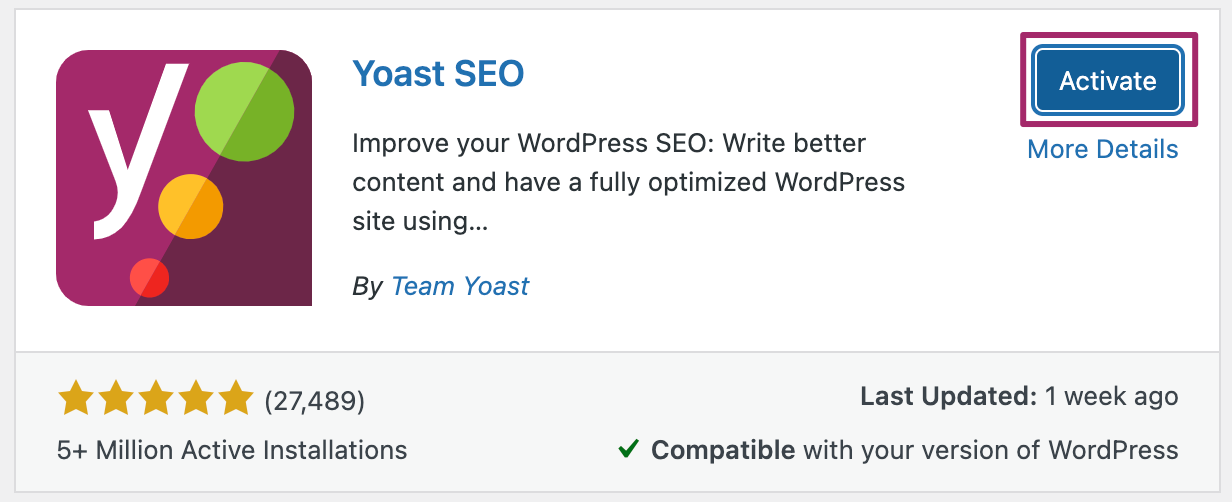
- Click the Install Now button of the Yoast SEO plugin to start the installation.
- Activate the pluginOnce the installation has finished, click the Activate button.
- Congratulations on installing the Yoast SEO plugin!You can now go and

12. Secure Your Website
Security works both ways. There are steps you can take to safeguard
your website and WordPress.com account:
Choose a Strong Password
Your password is the weakest link to the security of anything you do
online. It’s the key to your website, email, social networking
accounts, and any other online service you use. If your password is
easy to guess, your online identity is vulnerable. All it takes is one
person to guess your password, and they could deface your site,
steal your domain, or impersonate you.
Every password you use has to be easy to remember and hard to
guess. A random set of numbers and characters makes for a
hard-to-guess password, but they’re also hard to remember.
On the other hand, you’ll probably never forget your birthdate or
the name of your first pet, but these make for very bad passwords,
as they are increasingly easy to guess or find out.
On WordPress.com, you can use a very long password with any
combination of letters, numbers, and special characters, so the
security of your password – and your website – is really up to you.
We’ve collected some tips for creating strong passwords.
Enable Two-Step Authentication
In addition to a strong password, we recommend adding another
layer of account security with two-step authentication. Two-step authentication adds an extra step to your login process:
after you enter your password, you must provide a code from your
phone or a physical key. This is more secure because even if
someone knows your password, they cannot access your account
unless they also have access to your phone or physical key.
Learn how to enable two-step authentication here.
Don't let a mediocre host slow you down – switch to Bluehost.com
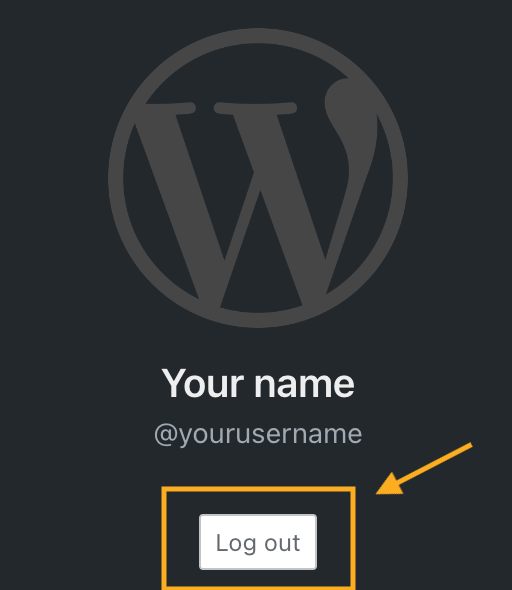
Log Out of Your Account
You can protect your account by logging out when you are finished
working. This is especially important when working on a shared
or public computer. If you don’t log out, someone can access your
account by viewing the browser history and returning to your
WordPress.com dashboard.
To log out of your WordPress.com account, click on your profile at
https://wordpress.com/me. Then, click on the Log Out button:
Choose Appropriate User Roles
You can invite other people to contribute to your website. This is ideal for group blogs with
multiple authors, magazine-style sites with an editorial workflow,
or any other large site where you want to share some of the
administrative load.
However, sharing the load also means sharing the responsibilities.
That’s why on WordPress.com, you can set different roles for each user you add to your site. Each role has different levels of
permission:
Contributor: the most limited role; can only write draft
posts but can’t publish them.
Author: can publish posts and upload images but can’t
touch other users’ posts.
Editors: can edit or publish any user’s posts, moderate
comments, and manage categories and tags.
Administrators: have full control of the site – they can
even delete it.
When adding users, choose the role that best suits what you want
them to do on your website. If you’re setting up an account for a
user who only plans to write a few posts, make them a Contributor.
Reserve the Author and Editor roles for trusted users with a
long-term commitment to your site.
Finally, be particularly cautious with the Administrator role. When you make another user an Administrator, you give them
full access to make any changes to the website. Only add an admin
that you trust, and remove them when you no longer need them to
access the site.
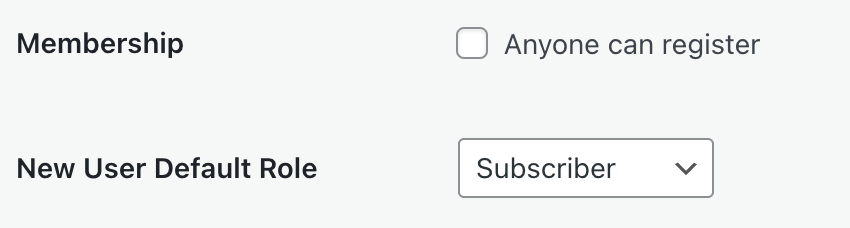
Membership: Anyone Can Register
Plugin-enabled sites include a “Membership: Anyone can register
” option that allows anyone to create an account on your site via the
default registration page. Depending on the default role granted, this setting can create a security risk varying from granting
complete control over a site to allowing unwanted spam users.
The setting is disabled by default. You may need to activate it when
creating a custom membership site or when using membership plugins. To verify if your plugin requires this setting, please refer to the
plugin’s documentation. If you are not using a membership plugin
that requires this setting and do not have a custom setup relying on
this option, we recommend keeping this option deactivated.
To locate the “anyone can register” setting, take the following steps:
Navigate to Settings → General and select the Classic view from
the View tab in the upper right corner. If you are already using
WP-Admin, you will see the Classic view by default.
In the WP-Admin General Settings page, locate the Membership
setting and uncheck the box.
Click “Save Changes” at the bottom of the page.
13. Install Google Analytics to monitor your website performance
Google Analytics is a powerful tool available on eligible
WordPress.com plans for tracking traffic to your site. This guide will show you how to add
Google Analytics to your website.
How to Enable Google Analytics on WordPress.com
You can use several methods to add Google Analytics to a WordPress
website, but most require installing a plugin like Google Site Kit or adding code to the site header. For WordPress.com site owners, we offer an easy-to-use setting to
enable Google Analytics without any plugins or code.
Step 1: Sign Up to Google Analytics
To get started, sign up on the Google Analytics website by clicking the Get Started button. When signing up, you’ll fill in an “Account name” and
review some data-sharing options to opt in or out of, as shown
below. When you’re ready, click the Next button.
If you already have a Google Analytics account for other sites, click
Admin and then click “Create Account” and then continue with the next steps.

The next step will ask you to create a property, which will likely be
your website’s name.

On the Property Setup screen, fill in the following details:
Property Name: Enter a name for your property, such as
your site title.
Reporting Time Zone: Choose the timezone you want the
reporting of your website to be in.
Currency: Choose the currency of the location you normally
operate in.
On the next screen, fill in the requested details about your business
or industry, and click the Next button.

The next screen will ask you about your goal(s) for using Google
Analytics. Select all that apply, and then click the Create button:

A pop-up will appear with the Google Analytics Terms of Service
agreement. You must accept the terms to use Google Analytics.
You will then be presented with this screen asking you to choose a
property:

Choose the Web here. Keep https:// selected, then type your domain
without the www. Type something in the Stream Name box (this
can be your site’s title again) and click Create Stream.

Step 2: Get Your Measurement ID
After following the steps in the previous section, you will be
presented with this screen to install a Google tag on your site:
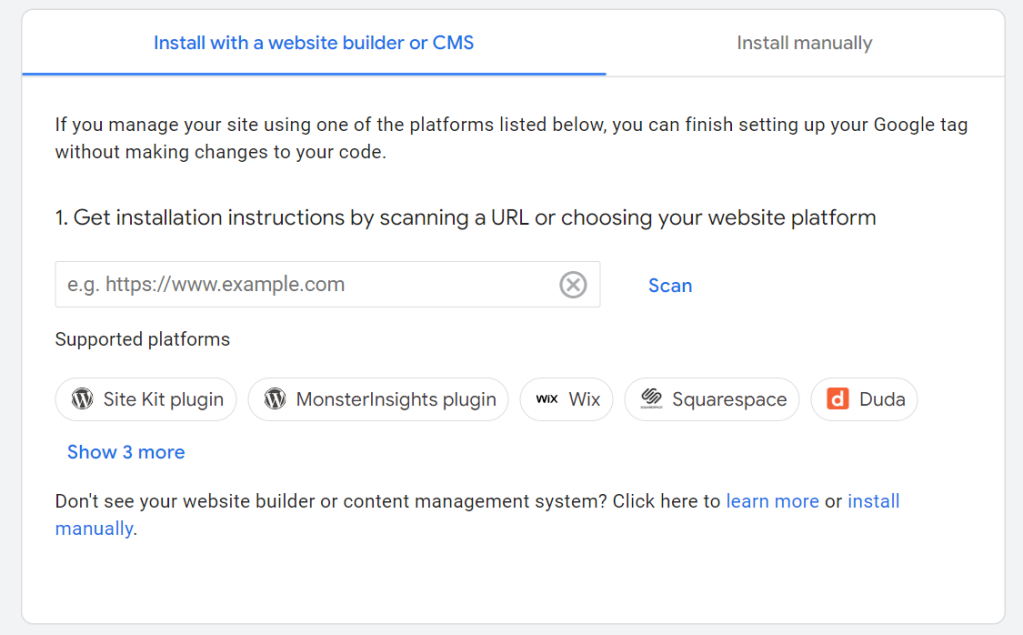
Click “Site Kit plugin” with the WordPress logo next to it. We’re not going to use the
plugin — instead, choosing this option will show you your site’s
tag ID that looks like this example :

Click the copy icon next to your tag ID to copy it to your clipboard.
If you have a plugin-enabled site, you can follow Google’s steps to use their Site Kit plugin to set up
your Google tag. However, this is not required because
WordPress.com provides you with a setting to paste your tag ID.
Copy just the tag ID as shown above, then move on to the next
section in this guide.
Step 3: Add the ID to Your WordPress Site
Visit your site’s dashboard on WordPress.com.
Navigate to Tools → Marketing (or Jetpack → Settings if using
WP-Admin).
Select the Traffic tab.
Scroll about halfway down the page to the Google section.
In the box labelled “Google Analytics Measurement ID,” paste
in your tag ID.
Click the Save settings button.
Your site will now connect to Google Analytics and send data to
Google. Give it time for Google to start displaying your site’s
information (statistics will not appear from before your site was
connected to Google Analytics.)

Done ! Now ,You have successfully created a website with your own
domain using WordPress! and what you need to do is fill the website
with the best content.
However, don't forget, great content needs to be supported by
top-notch website performance. If not, your website could end up
turning on and off erratically. Ouch, that's a hassle, right?
So, when it comes to website performance, domain and hosting are
the keys. Don't choose the wrong hosting provider! Bluehost.com provides various hosting service packages to suit your needs.
Don't want the hassle? Use reliable web creation services from
Bluehost.com now!
If you want to create your own website with the WordPress platform,
WordPress Hosting services are the best recommendation.
Starting from just $2.95/month , you can create a website without coding and optimise for
WordPress. Interested in trying?
Now Get Try WordPress Hosting Services at Bluehost.com!
Source Reference :
No comments:
Post a Comment