Shielded Loop Antennas

The loop antennas discussed thus far in this chapter have all been unshielded types. Unshielded loops work well under most circumstances, but in some cases their pattern is distorted by interaction with the ground and nearby structures (trees, buildings, etc.). In my own tests, trips to a nearby field proved necessary to measure the depth of the null because of interaction with the aluminum siding on my house. Figure 15-8 shows two situations. In Fig. 15-8A we see the pattern of the normal “free space” loop, i.e., a perfect figure-8 pattern. When the loop interacts with the nearby environment, however, the pattern distorts. In Fig. 15-8B we see some filling of the notch for a moderately distorted pattern. Some interactions are so severe that the pattern is distorted beyond all recognition.


The solution to the problem is to reduce interaction by shielding the loop, as in Fig. 15-9. Loop antennas operate on the magnetic component of the electromagnetic wave, so the loop can be shielded against voltage signals and electrostatic interactions. In order to prevent harming the ability to pick up the magnetic field, a gap is left in the shield at one point. There are several ways to shield a loop. You can, for example, wrap the loop in adhesive-backed copper-foil tape. Alternatively, you can wrap the loop in aluminum foil and hold it together with tape. Another method is to insert the loop inside a copper or aluminum tubing frame. Or—the list seems endless.

Tuning Schemes for Loop Antennas

Loop performance is greatly enhanced by tuning the inductance of the loop to the desired frequency. The bandwidth of the loop is reduced, which reduces front-end overload. Tuning also increases the signal level available to the receiver by a factor of 20 to 100 times. Although tuning can be a bother if the loop is installed remotely from the receiver, the benefits are well worth it in most cases. There are several different schemes available for tuning, and these are detailed in Fig. 15-6. The parallel tuning scheme, which is by far the most popular, is shown in Fig. 15-6A. In this type of circuit, the capacitor (C1) is connected in parallel with the inductor, which in this case is the loop. Parallel resonant circuits have a very high impedance to signals on their resonant frequency and a very low impedance to other frequencies.
As a result, the voltage level of resonant signals is very much larger than the voltage level of off-frequency signals. The series resonant scheme is shown in Fig. 15-6B. In this circuit, the loop is connected in series with the capacitor. A property of series resonant circuits is that they offer a high impedance to all frequencies except the resonant frequency (exactly the opposite of the case of parallel resonant circuits).
As a result, current from the signal will pass through the series resonant circuit at the resonant frequency, but off-frequency signals are blocked by the high impedance. There is a wide margin for error in the inductance of loop antennas, and even the precise-looking equations to determine the required values of capacitance and inductance for proper tuning are actually only estimations. The exact geometry of the loop “as built” determines the actual inductance in each particular case. As a result, it is often the case that the tuning provided by the capacitor is not as exact as desired, so some form of compensation is needed. In some cases, the capacitance required for resonance is not easily available in a standard variable capacitor, and some means must be provided for changing the capacitance.
Figure 15-6C shows how this is done. The main tuning capacitor can be connected in either series or parallel with other capacitors to change the value. If the capacitors are connected in parallel, then the total capacitance is increased (all capacitances are added together). If the extra capacitor is connected in series, however, then the total capacitance is reduced. The extra capacitors can be switched in and out of a circuit to change frequency bands. Tuning of a remote loop can be a bother if it is done by hand, so some means must be found to do it from the receiver location (unless you enjoy climbing into the attic or onto the roof). Traditional means of tuning called for using a low-rpm dc motor, or stepper motor, to turn the tuning capacitor. A very popular combination was the little 1- to 12-rpm motors used to drive rotating displays in retail store show


windows. But this approach is not really needed today. We can use varactor voltagevariable capacitance diodes to tune the circuit. A varactor works because the junction capacitance of the diode is a function of the applied reverse-bias voltage. A high voltage (such as 30 V) drops the capacitance, whereas a low voltage increases it. Varactors are available with maximum capacitances of 22, 33, 60, 100, and 400 pF. The latter are of most interest to us because they have the same range as the tuning capacitors normally used with loops. Figure 15-7 shows how a remote tuning scheme can work with loop antennas. The tuning capacitor is a combination of a varactor diode and two optional capacitors: a fixed capacitor (C1) and a trimmer (C2). The dc tuning voltage (V t) is provided from the receiver end from a fixed dc power supply (V
). A potentiometer (R1) is used to set the voltage to the varactor, hence also to tune the loop. A dc blocking capacitor (C3) keeps the dc tuning voltage from being shorted out by the receiver input circuitry.

Transformer Loop Antenna

It is common practice to make a small loop antenna with two loops rather than just one. Figure 15-5 shows such a transformer loop antenna. The main loop is built exactly as discussed above: several turns of wire on a large frame, with a tuning capacitor to resonate it to the frequency of choice. The other loop is a one- or two-turn coupling loop.This loop is installed in very close proximity to the main loop, usually (but not necessarily) on the inside edge not more than a couple of centimeters away. The purpose of this loop is to couple signal induced from the main loop to the receiver at a more reasonable impedance match. The coupling loop is usually untuned, but in some designs a tuning capacitor (C2) is placed in series with the coupling loop. Because there are many fewer turns on the coupling loop than on the main loop, its inductance is considerably smaller. As a result, the capacitance to resonate is usually much larger. In several loop antennas constructed for purposes of researching this chapter,


I found that a 15-turn main loop resonated in the AM BCB with a standard 365-pF capacitor, but the two-turn coupling loop required three sections of a ganged 3 365-pF capacitor connected in parallel to resonate at the same frequencies. In several experiments, I used computer ribbon cable to make the loop turns. This type of cable consists of anywhere from 8 to 64 parallel insulated conductors arranged in a flat ribbon shape. Properly interconnected, the conductors of the ribbon cable form a continuous loop. It is no problem to take the outermost one or two conductors on one side of the wire array and use them for a coupling loop.

Air core frame loops (“box” loops)

A wire loop antenna is made by winding a large coil of wire, consisting of one or more turns, on some sort of frame. The shape of the loop can be circular, square, triangular, hexagonal, or octagonal. For practical reasons, the square loop seems to be most popular. With one exception, the loops considered in this section will be square, so you can easily duplicate them. The basic form of the simplest loop is shown in Fig. 15-2. This loop is square, with sides the same length A all around. The width of the loop (B) is the distance from the first turn to the last turn in the loop, or the diameter of the wire if only one turn is used. The turns of the loop in Fig. 15-2 are depth wound, meaning that each turn of the loop is spaced in a slightly different parallel plane. The turns are spaced evenly across distance B. Alternatively, the loop can be wound such that the turns are in the same plane (this is called planar winding). In either case, the sides of the loop (A) should be not less than five times the width (B). There seems to be little difference between depth- and planar-wound loops. The far-field patterns of the different shape loops are nearly the same if the respective cross-sectional areas ( r2 for circular loops and A2 for square loops) are less than 2/100. The reason why a small loop has a null when its broadest aspect is facing the signal is simple, even though it seems counterintuitive at first blush. Take a look at Fig. 15-3. Here, we have two identical small loop antennas at right angles to each other. Antenna A is in line with the advancing radio wave, whereas antenna B is broadside to the wave. Each line in the wave represents a line where the signal strength is the same, i.e., an “isopotential line.” When the loop is in line with the signal (antenna A), there is a difference of potential from one end of the loop to the other, so current can be induced in the wires. When the loop is turned broadside, however, all points on the loop are on the same potential line, so there is no difference of potential between segments of the conductor. Thus little signal is picked up (and the antenna therefore sees a null). The actual voltage across the output terminals of an untuned loop is a function of the angle of arrival of the signal (Fig. 15-4), as well as the strength of the signal and the design of the loop. The voltage Vo is given by


Even though the output signal voltage of tuned loops is higher than that of untuned loops, it is nonetheless low compared with other forms of antenna. As a result, a loop preamplifier usually is needed for best performance.

Small loop receiving antennas


Radio direction finders and people who listen to the AM broadcasting bands, VLF, medium-wave, or the so-called low-frequency tropical bands are all candidates for a small loop antenna. 

These antennas are fundamentally different from large loops and other sorts of antennas used in these bands. Large loop antennas have a length of at least 0.5 , and most are quite a bit larger than 0.5 . Small loop antennas, on the other hand, have an overall length that is less than 0.22 , with most being less than 0.10 . 

The small loop antenna responds to the magnetic field component of the electromagnetic wave instead of the electrical field component. One principal difference between the large loop and the small loop is found when examining the RF currents induced in a loop when a signal intercepts it.

 In a large loop, the current will vary from one point in the conductor to another, with voltage varying out of phase with the current. In the small loop antenna, the current is the same throughout the entire loop.

 The differences between small loops and large loops show up in some interesting ways, but perhaps the most striking is the directions of maximum response—the main lobes—and the directions of the nulls. 

Both types of loops produce figure-8 patterns but in directions at right angles with respect to each other. The large loop antenna produces main lobes orthogonal,at right angles or “broadside,” to the plane of the loop. Nulls are off the sides of the loop. 

The small loop, however, is exactly the opposite: The main lobes are off the sides of the loop (in the direction of the loop plane), and the nulls are broadside to the loop plane (Fig. 15-1A). Do not confuse small loop behavior with the behavior of the loopstick antenna. 

Loopstick antennas are made of coils of wire wound on a ferrite or powdered-iron rod. The direction of maximum response for the loopstick antenna is broadside to the rod, with deep nulls off the ends (Fig. 15-1B). Both loopsticks and small wire loops are used for radio direction-finding and for shortwave, low-frequency medium-wave, AM broadcast band, and VLF listening.


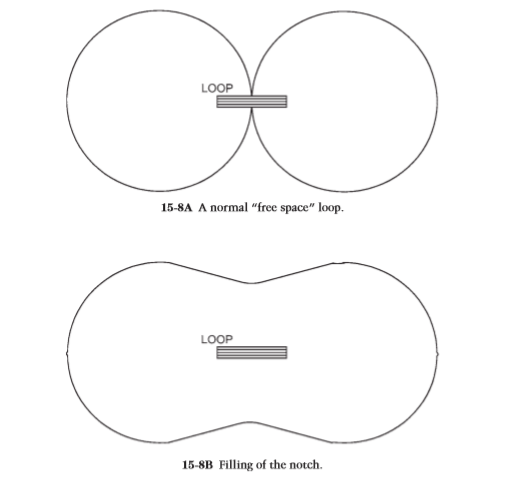
The nulls of a loop antenna are very sharp and very deep. Small changes of pointing direction can make a profound difference in the response of the antenna. If you point a loop antenna so that its null is aimed at a strong station, the signal strength of the station appears to drop dramatically at the center of the notch. 

Turn the antenna only a few degrees one way or the other, however, and the signal strength increases sharply. The depth of the null can reach 10 to 15 dB on sloppy loops and 30 to 40 dB on well-built loops (30 dB is a very common value). I have seen claims of 60-dB nulls for some commercially available loop antennas. 

The construction and uniformity of the loop are primary factors in the sharpness and depth of the null.


At one time, the principal use of the small loop antenna was radio direction-finding, especially in the lower-frequency bands. The RDF loop is mounted with a compass rose to allow the operator to find the direction of minimum response. The null was used, rather than the peak response point, because it is far narrower than the peak. 

As a result, precise determination of direction is possible. Because the null is bidirectional, ambiguity exists as to which of the two directions is the correct direction. What the direction-finder “finds” is a line along which the station exists. If the line is found from two reasonably separated locations and the lines of direction are plotted on a map, then the two lines will cross in the area of the station. Three or more lines of direction (a process called triangulation) yields a pretty precise knowledge of the station’s actual location. 

Today, these small loops are still used for radio direction-finding, but their use has been extended into the general receiving arena, especially on the low frequencies. One of the characteristics of these bands is the possibility of strong local interference smothering weaker ground-wave and sky-wave stations.

 As a result, you cannot hear cochannel signals when one of them is very strong and the other is weak. Similarly, if a cochannel station has a signal strength that is an appreciable fraction of the desired signal and is slightly different in frequency, then the two signals will heterodyne together and form a whistling sound in the receiver output. 

The frequency of the whistle is an audio tone equal to the difference in frequency between the two signals. This is often the case when trying to hear foreign BCB signals on frequencies (called split frequencies) between the standard spacing. The directional characteristics of the loop can help if the loop null is placed in the direction of the undesired signal. 

Loops are used mainly in the low-frequency bands even though such loops are either physically larger than high-frequency loops or require more turns of wire. Loops have been used as high as VHF and are commonly used in the 10-m ham band for such activities as hidden transmitter hunts. 

The reason why low frequencies are the general preserve of loops is that these frequencies are more likely to have substantial ground-wave signals. Sky-wave signals lose some of their apparent directivity because of multiple reflections. 

Similarly, VHF and UHF waves are likely to reflect from buildings and hillsides and so will arrive at angles other than the direction of the transmitter. As a result, the loop is less useful for the purpose of radio directionfinding.

 If your goal is not RDF but listening to the station, this is hardly a problem. A small loop can be used in the upper shortwave bands to null a strong local groundwave station in order to hear a weaker sky-wave station. 

Finally, loops can be useful in rejecting noise from local sources, such as a “leaky” electric power line or a neighbor’s outdoor light dimmer. Let’s examine the basic theory of small loop antennas and then take a look at some practical construction methods.
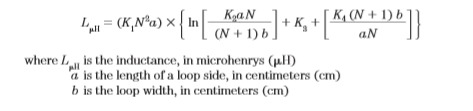

Grover’s equation 

Grover’s equation (Grover, 1946) seems closer to the actual inductance measured in empirical tests than certain other equations that are in use. This equation is
n is the number of turns in the loop
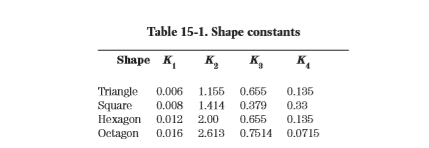
K1through K4 are shape constants and are given in Table 15-1
ln is the natural log of this portion of the equation